|

DDN
| |
Students created geometric solid models and their nets. After selecting
an example solid, students took a digital picture, imported into a document, and
turned in the project electronically. Assignment guidelines
More projects on next page
| Hexagonal Prism
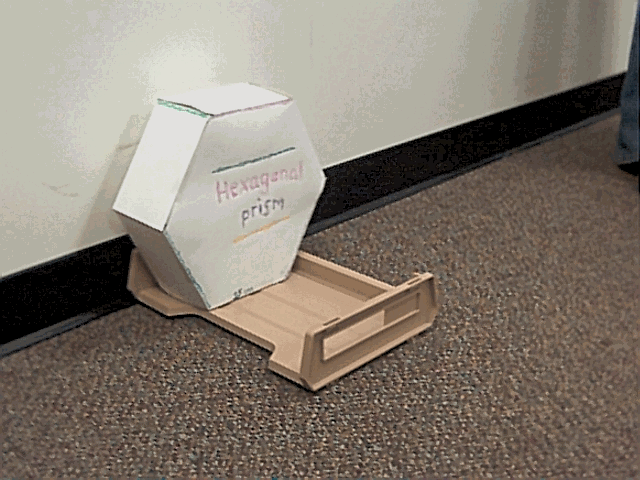
The geometric solid in which
we chose to do was a hexagonal prism. We chose this one mainly because we
would receive an extra bonus point for doing it and because we found a
shape that was an example of a hexagonal prism. We created the net by
using a compass to first draw a circle, then we made the sides of the
prism within the circle, we then drew rectangular sides from each of the
edges, after that was all finished we cut out the prism and we had the
net.
Our project meets the requirements because we have a net, the actual
shape that it made, calculated the volume and surface area, took a picture
by using the digital camera, and finally we found a shape that was a
hexagonal prism. The difficulty in which we encountered was trying to get
the full net to fit on the piece of tagboard by using the compass to draw
a circle. Otherwise it was rather easy to construct. We would not do
anything differently next time; we feel that this time went pretty
smoothly. Improving this assignment would not be possible, because it is
fine the way that it is!!! |
| Rectangular Prism
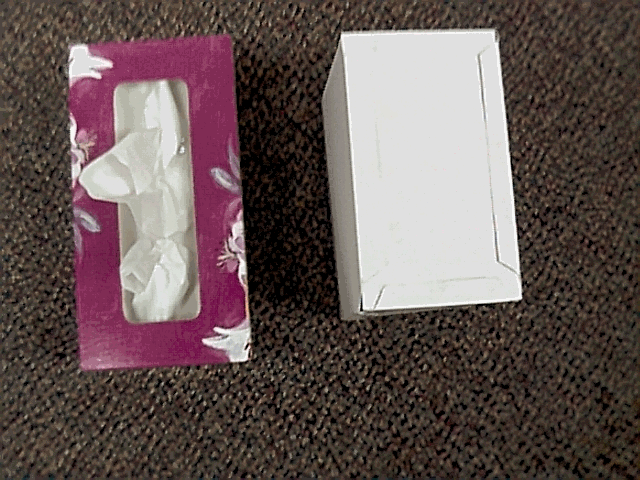
We decided to construct a rectangular prism, because
it happened to be the easiest to put together. We created the net by
meeting to requirements in length; we have four inches by seven inches.
The length requirement was at least ten centimeters long. That was very
easy to meet. It was sort of difficult to make the net that we were going
to put together as a prism, due to the fact that we had to put flaps on
certain edges so the assembly would be easier.
The project was put together very well. The only thing I would change
would be that we could make prisms with cuter paper and more creative
designs on the prism than just plain white tag board. So I would
definitely change the tag board that we had to use to make the prism. I
think that it would be a little more enjoyable if we could have made our
designs to look exactly like a Kleenex box, per say. So it would be really
cool if on the outside we got our own constructed prism to look exactly
like the prism we brought in.
|
| back to top |
|
Heptagonal Prism
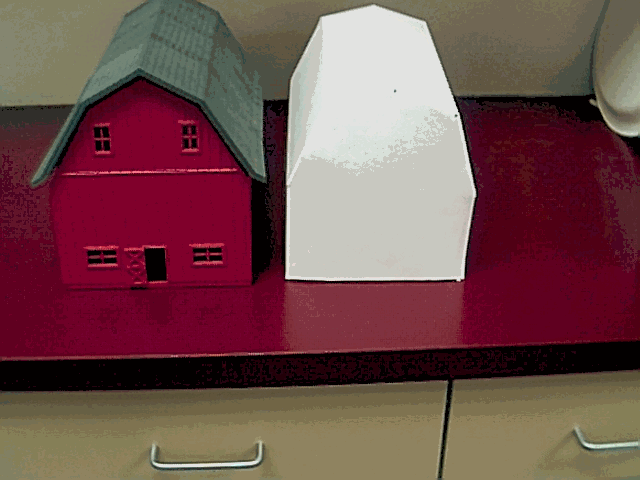
My partner and I chose the heptagonal
prism, not only to get an extra bonus point, but because we had a barn
that looked exactly like a heptagonal prism. By bringing in the barn that
would also allow us to receive another bonus point and because heptagonal
prisms are cool looking prisms! We created the net of the prism first by
determining how many sides we needed to fit onto the net. The next step
was figuring out how big the measurements needed to be and how exactly we
were going to make the net look like an un-folded prism. Our project meets
all of Mrs.Kroon’s requirements. We have the net of our prism, the
actual prism, with sides according to scale, and we also have a prime
example of what our prism should look like.
One major difficulty we encountered while doing this project was we had
forgotten to add another side to our prism! So we had to do a little
backtracking. Another problem we had was making the prism sides even with
the other ones. If my partner and I were to do this same project again, I
think we would chose to do a rectangular prism; it would have been much
simpler! The only thing we would change about this project would be to
change the requirement about the size of the prism. Instead of giving us a
set measurement, we should be allowed to chose the size we want to make
our prisms. |
|
Rectangular Prism

We chose to do a rectangular prism because we thought that it would be
easier to find an everyday object that looks similar to it. Our net and
prism were created out of tag board. We simply came up with a base of 5
inches by 7 inches and went from there. Our prism is also 4 inches high.
To make our prism we used scotch tape and a little elbow grease.
Our project meets the requirements because it is neatly done, accurate,
and very appropriate. The only difficulties we encountered was when it
came time to tape the prism together. It took a lot of concentration and
thinking. Next time I think we would most definitely want to try a prism
that would challenge us a little more. There is nothing in this project we
would change. It was interesting and fun! |
| back to top |
| Pentagonal Prism
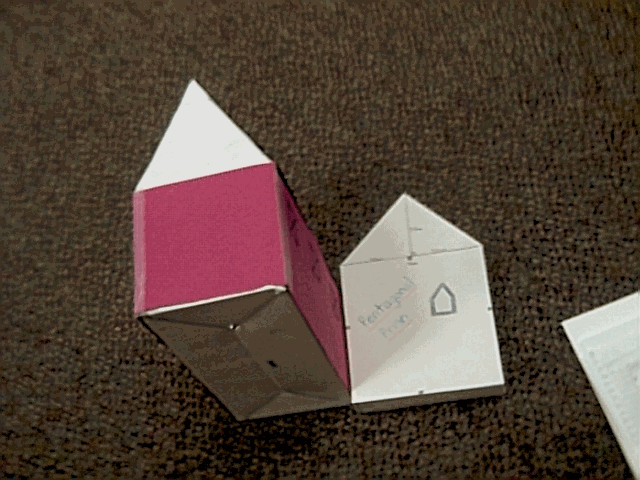
The reason we chose a pentagonal prism for our project
is because it looked like a barn. We thought that it would be easy to take
a picture of or build a barn to bring in as an example. We had to make a
net for our pentagonal prism. We did that by taking a piece of
poster-board and drawing a pentagon on it. Then we drew one rectangle on
each side. These would later become the sides of the pentagonal prism.
After that we drew another pentagon that was connected to one of the
rectangles. When folded up, the net made a pentagonal prism.
A couple of the difficulties that we encountered were
deciding on what prism to build, and meeting all of the requirements. Our
project meets the requirements because we have a net, the model, the
calculations, the example, the calculations for the model and the example,
the hard copy of our word document, and the computerized version of the
word doc. and the picture. Something that we would do differently is to
set up more time for the project. When we take a quiz, a test, and have
schoolwork in all of our other classes, it gets hard to find time for the
project. The one improvement that we would make is to give students more
time to work on the project in class. |
|
Triangular Prism
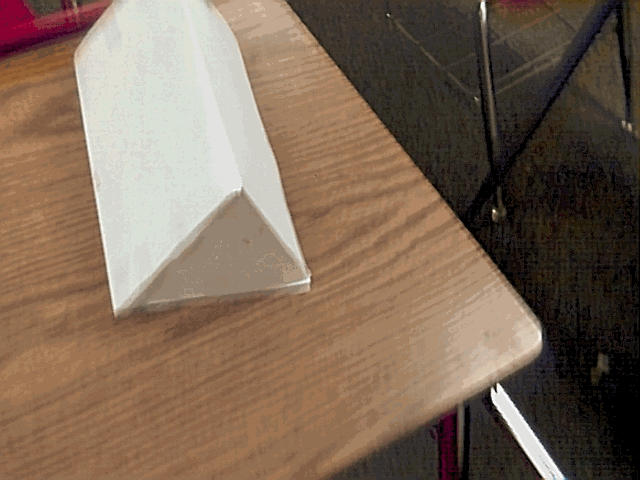
We picked triangular prism, because it was pretty easy and it also got
us a good ole bonus point along with it. The net of the triangular prism
was also very easy to make, we just took an example out of the book and
went from there. Our project met all requirements that were needed and the
measurements were 15 by 25 by 13cm. By saying that I mean that it is a
prism and its net does fold up into a triangular prism like shown above.

We picked a barn or a replica of a certain type of barn as our example
of a triangular prism. The top part of our barn as you see is in a shape
of a triangular prism. This barn shown here has two parts in which a
triangular prism appears. A triangular prism appear more than you might
think in modern day life for example, houses, sheds all along highways
show some kind of triangular prism. This project took a long time to do,
but was worth it and I would not change anything about it. |
| back to top |
Geometry
Project Chapter 7: Geometric Solids
Choose one of the following geometric solids:
rectangular prism
cylinder
triangular prism (1 bonus point)
pentagonal prism (1 bonus point)
hexagonal prism (1 bonus point)
heptagonal prism (1 bonus point)
octagonal prism (1 bonus point)
Create a net for the construction of this solid. (minimum size 10 cm.
per edge)
Construct a tagboard model of the geometric solid. Calculate the
volume and surface area of your model. Document your calculations.
Find an everyday object in the shape of your model. One bonus point
will be awarded if you bring the example to class.
Calculate the volume and surface area of this everyday shape.
Document your calculations.
Technology
Use a digital camera to take a picture of your model and example object
(in the same photo). Choose a neutral background for the picture.
Save the picture file (. jpg) on your home directory and on a floppy
disk. The title of the file is yournamenameofsolid. Example:
cindykroonpentagonalprism
Import the picture into a Word document. Re-size the picture to approx.
3x3 inches. Include two paragraphs in this document (see below). The title
of the document is yournamenameofsolid. Example:
cindykroonpentagonalprism
Save the document (. doc) on your home directory, and on a floppy disk.
Communications
1. Make a short presentation to the class discussing your project.
Submit two paragraphs about the project. Describe how you chose the
geometric solid, and how the net was created. Explain how your project
meets requirements. Also discuss in any difficulties you encountered.
What would you do differently next time? How would you improve this
assignment?
Turn in the following:
Net
Model
Calculations for model
Example (if possible), or picture of example
Calculations for example
Hard copy of your Word document (black and white OK)
Floppy disk with picture file (.jpg) and document file (.doc)
Evaluation: 30 pts.
Net (accurate design, to scale) 4 pts.
Model (accuracy and neatness of construction) 4 pts.
Model surface area and volume calculations (work must be shown) 4
pts.
Object (appropriate and creative) 4 pts.
Object surface area and volume calculations (work must be shown) 4
pts.
Communications 5 pts.
Technology 5 pts.
|
| back to top |
|
